Pages

Monday, October 31, 2016

Happy Halloween

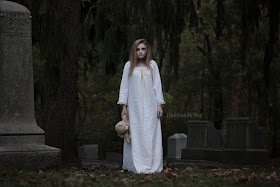
Halloween is such a great holiday! My kids think and think on what they want to be each year. My younger son is usually the quickest to decide. He can have his costume picked out in November and never change his mind. My girls normally waiver back and forth a bit until I make them lock in a decision. (My oldest doesn't dress up anymore really.) This year, my older daughter came up with the super cool idea to be a spirit.


I have to say, I think we knocked this out of the park.


Really, it's a very, very simple costume. We used Sisboom's Devon to create this classic gown from an old white bed sheet. But the result was definitely NOT your stereotypical ghost.


I lengthened the pattern to create the gown, making the back much longer than the front to get the trailing effect, but keeping it safe for trick or treating.


Jillian has some amazing make up skills and did her own hair and makeup. She did an incredible job and it really made this costume what it is, in my opinion.


Of course, we had to do her pictures at an old cemetery. We gave a runner quite the spook, too. That's the sign of an amazing costume. LOL


I mean, if I was running down a hill and came across this, I'd be pretty spooked myself!


 I love when simple has a big impact. 


Hope you have a safe and happy Halloween!

Monday, October 17, 2016

Love Notions Spectacular:Guest Blogger

Today, Handmade Boy is going to be handing the blog over to Alex for her stop on the Love Notions Spectacular. Alex is one of our amazing Love Notions testers and she is always sharing her awesome makes and I'm so proud to have her posting here today. I hope you enjoy!

img_2086 
Are you as excited as I am for the big Love Notions celebration? So many great events happening during this time. Speaking of celebrations...I wanted to show you all how I took two of my favorite Love Notions patterns, mashed them and made a party dress that is comfortable, yet stylish. So today in my blog I will be showing you how easy it is to mash the Bluezette with the Sybil skirt in order to get this dress look. Start by printing the patterns in your needed size. You will only need to print and cut the bodice and sleeves of the Bluezette. This hack workes will either one of the sleeves options. As far as the bodide goes, I prefered the looser bodice instead of the shorter fitted one. It is just my personal preference 😊. You can certainly use the tighter bodice, you will need to make some grading on the skirt though. I also chose to do the unlined option and cut the neck facing too. Should you prefer to make the lined option, you will not need to cut the facing. Isn't it awesome that Tami includes so many options in her patterns? Next print and cut the asymmetrical skirt option of the Sybil Illusion skirt. You do not need to cut a waistband. I used the knee length style with an 1 inch added to the length. This style dress will work amazingly with the midi length too. Let your style be your guide. You should now have a pile of fabric similar to this. img_2064 You will sew your Bluezette bodice according to the pattern instructions and set it aside. Next, sew the Sybil skirt (without the waistband). Mark the center front and center back with a pin/clip or a small snip. Take your Bluezette top and mark the center front mad back the same way. With the right sides together you will now match the side seams of the skirt to the side seams of the top. Pin them together. Match the center front/back of the skirt to the bodice's center front and back. Attach the skirt to the bodice using your sewing machine or your serger. img_2095 
You are almost done. All you have left to do now is decide if you'd like the elastic waist or not. For this one I skipped the elastic so the waist seam hits under my natural waist. Luckily, the Bluezette pattern has instructions on how and where to add the elastic casing so you achieve your desired look. Follow the directions if you'd like the cinched look. img_2076 
TIPS FOR USING THE FITTED BODICE: Eearlier in the blog I mentioned that you can use the shorter, more fitted bodice of the Bluezette instead of the relaxed fit longer one I used. The only change you will need to make would be to the Sybil skirt. You will need to grade the skirt at the top of the waist to match the width of the Bluezette top. Without grading the skirt will be wider than the bodice and you do not want to stretch it to fit. Since you are doing the asymmetrical skirt option you will need to grade both the pencil skirt part and the "wrap" piece of the skirt. img_2082 
 Hope you enjoyed this project and that you'll give it a try. Don't forget to share your creations in the Love Notions group and keep am eye out for all the great surprises we have planned during these celebrations.
 Alex
img_2088img_2097img_2096
Save
Love Notions would like to thank all of the amazing bloggers on the tour. Please be sure to stop by and see what awesomeness was created! And don't forget the guest bloggers participating each day on the Love Notions Blog!


Monday, October 10, 2016

A Wolf's Clothing

Once upon a time there was a boy who believed he was a wolf. He loved to run wild and free and explore everything nature had to offer.


So, his mother made a coat, especially for him, using the Wild Things Coat from Twig and Tale (formerly Big Little). She used the finest cotton knit she could find from Art Gallery Fabrics to ensure it would keep him warm even on the most chilliest of days.


Her little wolf boy exclaimed it was the "coziest coat ever" when he slipped it on.


The mother used Art Gallery's Tomahawk Stripe for the lining of the body. The hood and ears were lined with gorgeous Evening Lakeview from Art Gallery's Denim Studio.


The wolf boy declared his new coat perfect for exploring. He could sneak in the brush and hide while he watched all the other creatures in the forest. Which is exactly what little wolves love to do the boy said.


And when he was scared, he could pull his ears down, just like the other wolves. The wolf boy's mother used the largest cat ear pattern piece to ensure he could do just that.


The wolf boy was so happy. He wore his wolf coat everywhere he could and watched the other creatures in the forest in awe.


The mother made a small change to the pattern and added a zipper so the wind could not blow and make her little wolf boy chilly.


Adding the zipper was such a simple thing to do. And she shared how to do it on Twig and Tale's blog so all the wolf boy mothers could keep their children safe from the wind.


The wolf boy loved his new coat so much that he wanted to be other creatures too! Luckily for him the Wild Things Coat includes many, many ear and even tail designs. But the wolf boy decided he wanted to be a DRAGON next! And now he can! 

I would like to thank Twig & Tale and Art Gallery Fabrics for having me on this tour and supplying both the pattern and Art Gallery Fabrics used for this post.

What would a Blog Tour be without a giveaway!

Art Gallery Fabrics is kindly sponsoring 2 yards of Art Gallery fabric of your choice. To make the prize extra sweet, we are also adding a collection of 5 Twig + Tale patterns of your choice.
International entries are very welcome. Our bloggers come from every corner of the world to celebrate the global nature of Twig +Tale too.

Enter using the rafflecopter below.
(The winning entry will be checked to ensure all criteria are met).